The Right Tools in the Right Place: Configuring & Customizing Drupal’s CKEditor
The authoring experience is core to any content management system. Very few web content admins prefer to work in HTML, so they use a What-You-See-Is-What-You-Get editor nicknamed a WYSIWYG (pronounced whizzy wig
). There are many free and paid WYSIWYG solutions out there, but the big two that have been around for 10 years or more and have been adopted into widely available open source projects are CKEditor and TinyMCE. Drupal and WordPress long ago decided to pick one as their recommended editor, and so WordPress uses TinyMCE and Drupal uses CKEditor[1].
The power of a WYSIWYG like CKEditor is in its ability to be customized. Drupal makes it easy to customize the authoring experience for any user role and in any configuration that a site needs. Super Admins can have access to a fully featured “Full HTML” version of the editor while your content authors have access to a “Basic HTML” version that locks out certain kinds of code that may do harm to a website.
Oomph customizes CKEditor for each custom Drupal (or WordPress) site we build. As a best practice, though, we like to start from the same place. We’d like to share our “default” CKEditor set up as well as the steps that you need to take to customize CKEditor yourself.
Customize CKEditor Text Formats by User Roles
Drupal allows multiple CKEditor configurations, and each can be available per user role — as mentioned previously. To understand the ways in which the editor can be customized, we first need to understand the user roles and default configurations.
User Roles
Drupal ships with three main user roles built in — Administrator, Authenticated User, and Anonymous User. More official documentation about User Roles is available from drupal.org.
An Anonymous user is someone that can’t log in — they can only view content on the front end of the site. To call them a “user” is a bit of a misnomer, but their actions are being tracked to the user ID of zero — therefore, Drupal still considers them a user.
An Authenticated user is someone that can log in but they can do very little. A new Drupal installation gives this user only a few permissions — they view Media, view published content, use shortcuts, and use the Basic HTML text format.
Finally, the Administrator can do everything by default. This was the first user created when a new site was installed, and by default, the account has permissions to do everything.
Many more roles can be created and permissioned of course, but these are the ones that come out of a default Drupal install. We usually create a new “Content Editor” user role for our clients as authors on the site with permissions to create and edit content.
Text Formats and Editors
CKEditor is included in Drupal core, so it comes pre-installed. There are three “text-formats” that the default installation of CKEditor comes with — Full HTML, Basic HTML, and Plain text.
These distinctions are very handy, and also by default, they map nicely to the User Roles we described. Plain text for Anonymous users with no ability to create content, Basic HTML for Authenticated users who might be able to author some content, and Full HTML for Administrators that need to have all of the elements that HTML provides.
The Plain text format is there when there is no other format available to a user — there is no WYSIWYG at all, therefore a <textarea> form element is naked of any formatting embellishments.
It is recommended to keep the Plain text editor plain and edit the format as little as necessary, if at all. When starting a new project, we edit the Basic and Full HTML formats to customize them to our liking.
Basic HTML
The Basic HTML editor comes with a small set of options by default — all the controls that you might expect from a rich text web editor, like heading formats, lists, blockquotes, alignment, bold, italic, and others. These options are a little disorganized, in our opinion[2], but since this is Drupal, we can customize it easily.
Out of the box, the Basic HTML format looks like this:
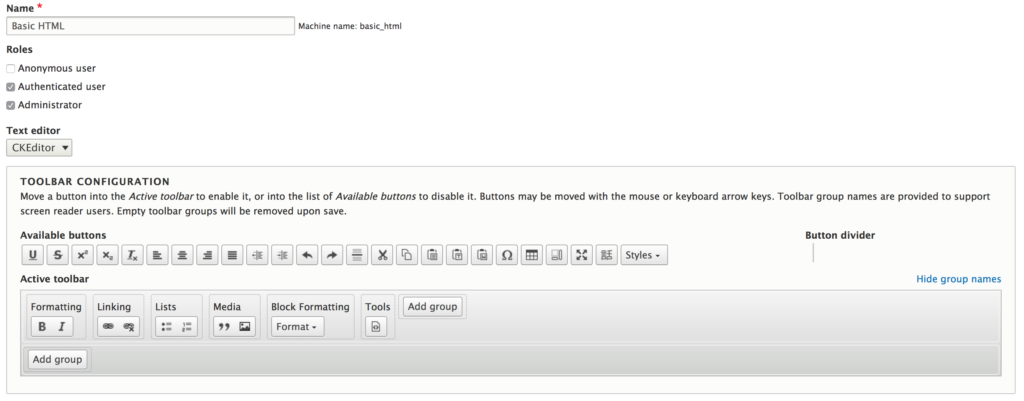
In the Toolbar Configuration area, admins can move “Available buttons” from the top row to the “Active Toolbar” below, and arrange them however they wish. We like to follow this grouping of button options:
- Block formatting: All of the HTML block-level elements — the Format drop down, Blockquote, Unordered list, and Ordered list
- Inline styles: Bold, Italic, Superscript, and Subscript. We don’t use the Strikethrough because it is seldom used and the Underline option because we wouldn’t want a visitor to confuse underlined text as a link if it is not
- Alignment: Left, Center, and Right. We don’t use Justify because it always looks bad (again, in our opinion)
- Linking: Add a link, Remove a link
- Insert: Anything that gets inserted into content — Horizontal rule, Paste plain text, Paste from Word (read an aside about this feature later on in the article). Basic HTML does not include an Image insertion from the Media Library for most sites
- Tools: Options for looking at the content differently — Full screen, Source view, and Remove content formatting
After the changes are made and saved, the Basic HTML text format looks like this:
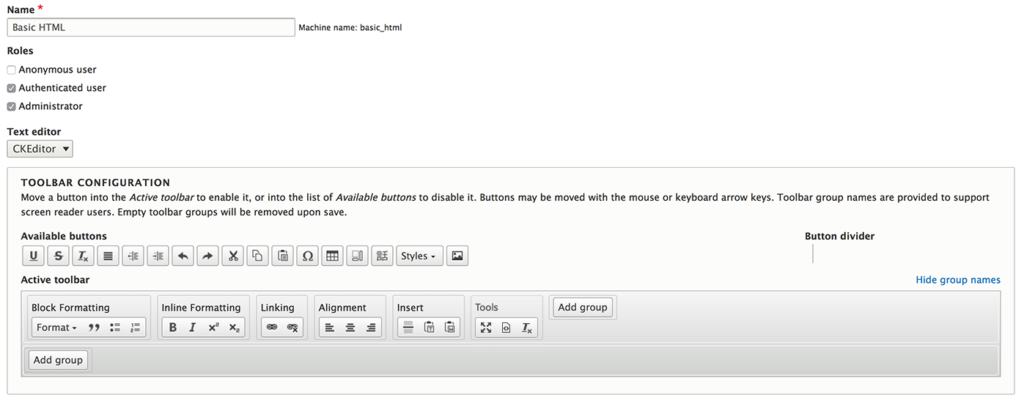
Much better. From here we will probably customize it further as additional modules or custom features add buttons that we decide to turn on for content authors.
One more thing should be looked at before finishing the Basic HTML Text format. If the “Limit allowed HTML tags and correct faulty HTML” filter is enabled (should be the first checkbox right under the Toolbar configuration), there will also be a Filter Settings area at the bottom of the admin page where the allowed HTML is displayed:
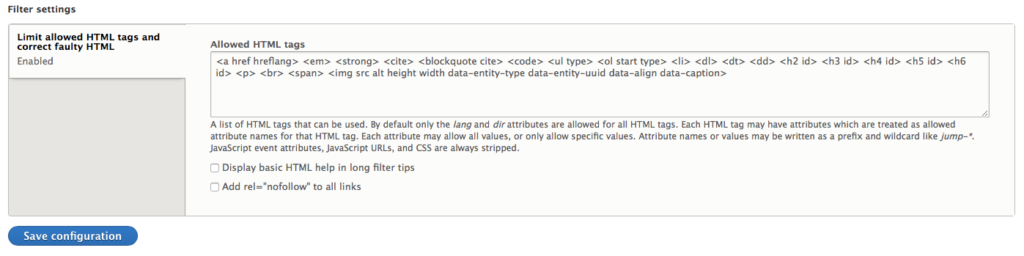
The default allowed HTML for Basic is:
<a href hreflang> <em> <strong> <cite> <blockquote cite> <code> <ul type> <ol start type> <li> <dl> <dt> <dd> <h2 id> <h3 id> <h4 id> <h5 id> <h6 id> <p> <br> <span> <img src alt height width data-entity-type data-entity-uuid data-align data-caption>
We edit ours slightly as follows to be more restrictive:
<a href hreflang target rel> <em> <strong> <cite> <blockquote cite> <code> <ul> <ol start> <li> <dl> <dt> <dd> <h1> <h2> <h3> <h4> <h5> <h6> <p class=""> <br> <img src alt height width> <hr> <sup> <sub> <span lang dir>
Limiting code for the Basic HTML Text format is a good idea. Authors may think that code copied from the web somewhere is fine because it will help them do this one thing, but more often that not it introduces display issues, and at worst, it introduces something malicious.
Full HTML
For Full HTML, the same ideas apply but with a few more options. Again, the default Drupal configuration for the Full HTML text format is this:
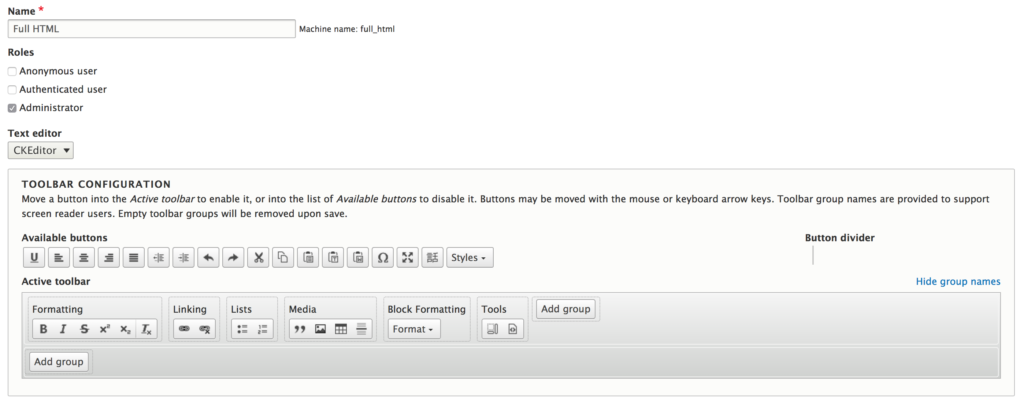
Not very different from the previous text format — a little more robust — and we improve it our own way.
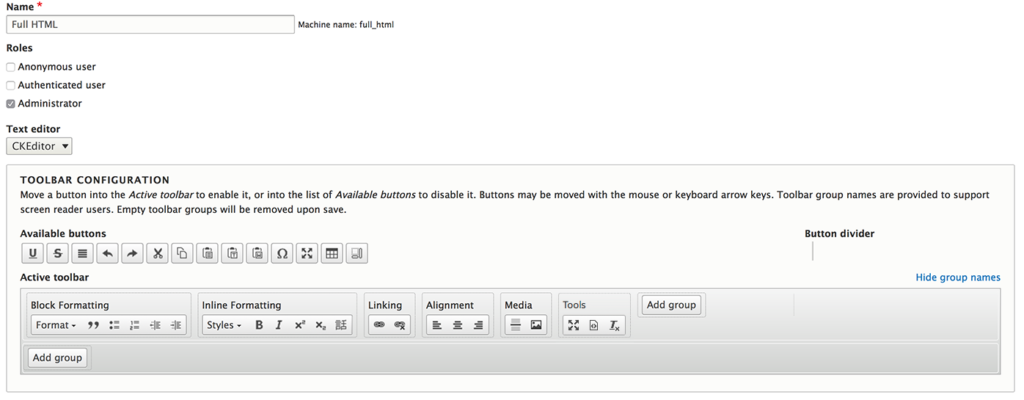
In addition to the same order and grouping as Basic HTML, we:
- Add Indent and Outdent to the Block formatting group. This is not a semantic HTML element but it will affect an entire block element by adding a class to the block HTML item
- Add the Styles drop down menu which enables custom classes for this project. We also add the Language formatting to the Inline group. On a per-project basis, we may decide to give these options to the Basic HTML text format
- Add Media to the Insert grouping and remove the paste options[3]
After adding Styles, Media, and Language, we get additional plugin settings below the Toolbar Configuration. For Media, edit those settings as you see fit. We try to keep uploads small and force Drupal to compress images that are uploaded straight from a camera. For Languages, depending on the site, you might want to enable to full set of language codes rather than the default six official languages of the United Nations.
Custom Theme Classes in CKEditor
To leverage the power of custom author styles, the Styles dropdown plugin setting is super important. This is how you get theme CSS classes into the editor! The list should take the format of [HTML element to apply the class to].[name of class]|[Label to display to user]
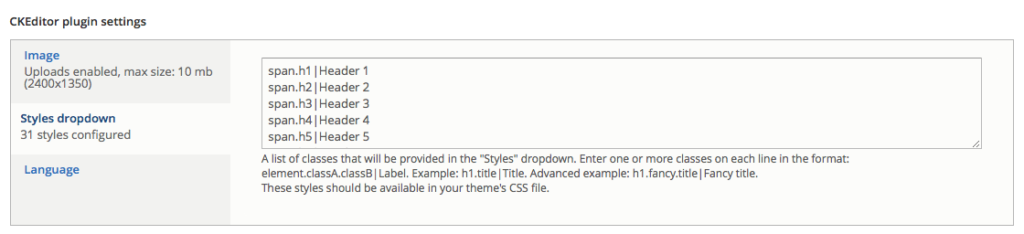
A subset of the styles that we add are as follows, and might look familiar to people that use Bootstrap utility classes:
p.lead|Paragraph Lead
ul.list-unstyled|List unstyled
span.display-1|Display1
span.display-2|Display2
span.display-3|Display3
span.h1|Header 1
span.h2|Header 2
span.h3|Header 3
span.h4|Header 4
span.h5|Header 5
span.h6|Header 6
span.text-small|Text size small
span.text-lowercase|Text Lower case
span.text-uppercase|TEXT ALL CAPS
span.text-abbr|Abbreviations
span.font-weight-light|Text light weight
span.font-weight-normal|Text normal weight
span.font-weight-bold|Text bold weight
Drupal does not allow the CSS * selector, which would mean that the requested class could be added to any HTML element — the rule can’t look like *.class-name|A Universal Style, for instance. That’s too bad, which is why we do the next best thing and apply most of our custom styles to <span> elements.
These settings allow an author to mix visual heading styles without changing the semantics. We find that it works pretty well. Say, for example, someone is designing the content for their page and they understand that an article with an H1 title needs to have subheads that are H2, and between H2s, you should only use an H3, etc… they understand the semantic structure of the page. But visually, maybe they want the H2s to look like H3s, and the H3s to look like H4s. That can be accomplished with the way we have structured our class naming and the application to <span> tags. The resulting HTML might look like this:
<h1>An introduction to CKEditor</h1>
<h2 class="h3">What is CKEditor?</h2>
<h2 class="h3">Customizing CKEditor</h2>
<h3 class="h4">Basic HTML</h3>
<h3 class="h4">Full HTML</h3>
<h2 class="h3">Getting theme CSS into the Editor</h2>
We get the semantics needed for good SEO and great accessibility, and the author gets the page to look they way that they want.
Matching the preview in CKEditor with your Site Theme
To finalize the customization and to give the author a much more complete experience, we add some code to our site’s theme files that injects the custom visual theme into the CKEditor preview pane. The authors, therefore, will get a much better sense of how their content will look because they will see the site’s fonts, colors, and typography styles.
We go from this:
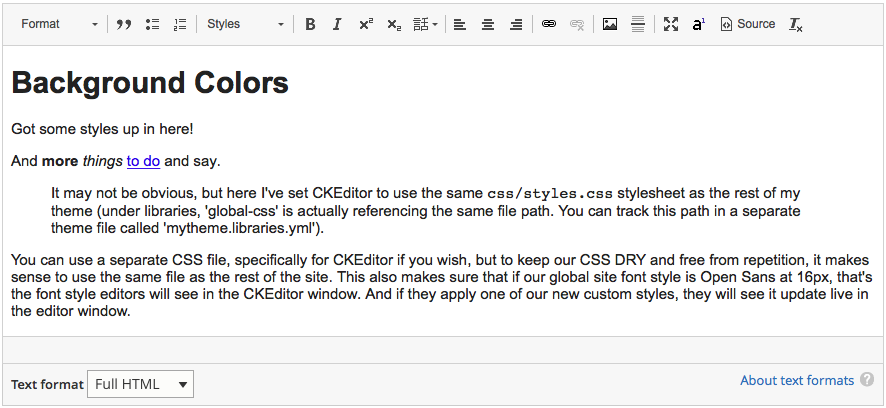
To this:
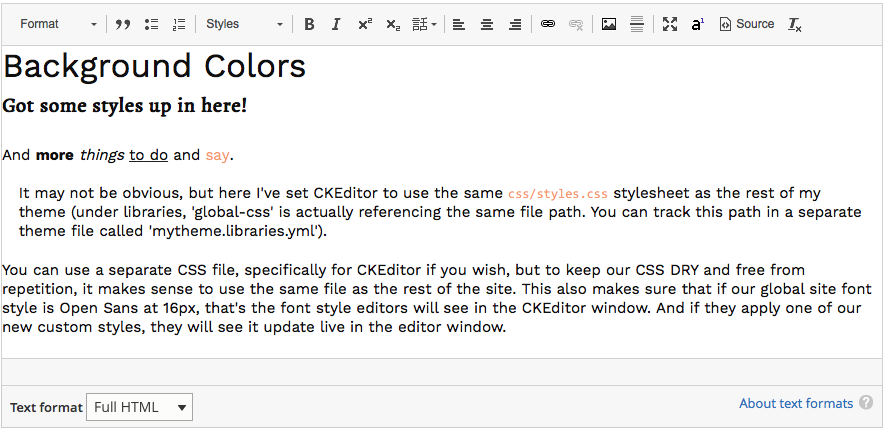
By just adding a little bit of code to the theme’s info file, or themes/custom/yourtheme/yourtheme.info.yml:
ckeditor_stylesheets:
  - assets/styles/main.cs
You can use a separate CSS file specifically for CKEditor if you wish, but to keep our CSS DRY, it makes sense to use the same file as the rest of the site — its already loaded and cached after all. When authors apply one of our new custom styles from the Styles dropdown menu they will see it update live in the editor window before they save and view the content.
And that’s it! Your Drupal 8 project has a customized admin experience with CKEditor sharing the same visual styles as your front end.
# Cleaning Text Pasted from Word
Now for a tangent into the world of pasting content from a Microsoft Word document.
Clients are going to cut and paste text from Word documents; you just can’t stop them. Luckily, CKEditor has a robust scrubber that will remove the junk from this code and maintain the most important styling like bold, italic, and headers (even tables if your editor allows them).
The way it works is pretty transparent, too. We keep the button in place for folks who might have used it before, but with CKEditor version 4, anything on the clipboard pasted into the editor will get scrubbed. When the editor detects code on the clipboard that contains junky content from Word, a little notification will pop up and let the user know that it sees what you are doing (shame shame) but it will clean it for you.

If you press Cancel, the content gets pasted without being scrubbed, while if you press OK, it will. Either way, the paste of new content happens and the allowed tags portion of the Editor configuration will kick in and do its job (which may remove some of the code from Word, but probably not all).
Test it yourself with the sample Word document on this page: ckeditor.com/docs/ckeditor4/latest/features/pastefromword.html
Just one Gotcha
But there is a pretty big catch to all of this. It might seem obvious, but it needs to be stated — don’t expect Paste from Word to work unless “Limit allowed HTML tags and correct faulty HTML” is turned on. If you are using the Full HTML text format, and the format allows any and all HTML code, Paste from Word will do nothing!
We had a scenario in which the client used the Full HTML editor because they needed access to Drupal Tokens and a few custom pieces that are rather advanced. When they pasted content from Word, though, they were getting all of the code that Word exports and the visual experience was not what they expected. When we took a look and saw the source code, we didn’t understand at first why the Paste from Word filter was not working.
What we (at Oomph) should have done was give them these advanced features in the Basic HTML editor, with “Limit allowed HTML tags and correct faulty HTML” turned on and perhaps a more complex and lengthy list of allowed HTML. This would have been a little more work but it would have saved time in the long run.
Sidebar to the Sidebar: Why is content from Word so bad?
You may be wondering, why does this matter? Microsoft Word is publishing software that 83% of the business world uses, how can it be that bad? Well, Word was created for the world of printing documents, not managing content on the web. On the web and in the projects we create, there is a visual theme that should control the look of all the content. The content pasted from Word tries to force its own visual styles over the styles of the custom theme. On top of all that, the code is terribly bloated.
Here is a simple example of a single three-word headline:
<h1 align="center" style="margin:12pt 0in; -webkit-text-stroke-width:0px; text-align:center"><span style="font-size:22pt"><span style="line-height:31.386667251586914px"><span style="break-after:avoid-page"><span style="font-family:"Times New Roman""><span style="font-weight:normal"><span style="caret-color:#000000"><span style="color:#000000"><span style="font-style:normal"><span style="font-variant-caps:normal"><span style="letter-spacing:normal"><span style="orphans:auto"><span style="text-transform:none"><span style="white-space:normal"><span style="widows:auto"><span style="word-spacing:0px"><span style="-webkit-text-size-adjust:auto"><span style="text-decoration:none"><span style="font-family:Georgia"><span style="color:black"> Recognition of Achievement</span></span></span></span></span></span></span></span></span></span></span></span></span></span></span></span></span></span></span></h1>
All this should actually be is:
<h1>Recognition of Achievement</h1>
In performance speak, that’s 922 bytes (one byte is one character) when it should be only 35 — an increase of 2600%!
All of these inline <span> tags with inline “styles” will override the site’s custom theme, making the content of this page look inconsistent. Some of these styles do nothing on the web at all — break-after:avoid-page, orphans:auto, and widows: auto are print styles, and the units pt and in are also for print. Other tags are inefficiently nested — font-family and color are declared twice (the innermost CSS rule wins, by the way). If you want to get really geeky, we discovered that the properties caret-color> and font-variant-caps are not even supported by Microsoft’s own web browser.
So yes, content cut and pasted from Word without any cleanup really is that bad.
What We Learned
- Custom site themes deserve a custom author experience as well
- Drupal 8 makes it easy to tailor the permissions, HTML options, and visual theme for the core of most authoring experiences, the WYSIWYG editor
- Pasting content from Word is terrible and bloated and will try to ruin the nice theme that you may have put in place, so make sure to enable “Limit allowed HTML tags and correct faulty HTML”
And knowing is half the battle… or maybe just one tenth.
Footnotes
- Drupal moved CKEditor into core in version 8. Previously, developers needed to pick their preferred editor and install it as a module. Return ⤴
- Why is Blockquote grouped with Media, like an image? No text alignment? “Formatting” and “Block Formatting” as labels? C’mon Drupal, we can do better. Return ⤴
- Removing the paste option is important as you can read in another section. Since this Text Format allows all HTML, using the paste tools would do nothing to strip content of bad HTML and styles. Return ⤴