An Intro to Theming Layout Builder Sections
This post will assume you have already completed the base setup of enabling Layout Builder and added the ability to manage layouts to one of your content types. If you are not to this point check out Drupal.orgs documentation on layout builder or this article by Tyler Fahey which goes over setup and some popular contrib module enhancements.
As we mentioned in part 1 of this series, you should expect a little DIY with Layout Builder. So far the best way we have found to theme Layout Builder is by creating a custom module to provide our own custom layouts and settings. By defining custom layouts in a custom module we get the ability to control each layout’s markup as well as the ability to add/remove classes based on the settings we define.
Writing the custom layout module
Setup the module
Start by creating your custom module and providing the required .info.yml file.
demo_layout.info.yml:
name: Demo Layout
description: Custom layout builder functionality for our theme.
type: module
core: 8.x
package: Demo

dependencies:
  - drupal:layout_builder
YAML
Remove default core layouts
Layout Builder comes with some standard layouts by default. There’s nothing wrong with these, but generally for our clients, we want them only using our layouts. This hook removes those core layouts, leaving only the layouts that we will later define:
demo_layout.module
/**
 * Implements hook_plugin_filter_TYPE__CONSUMER_alter().
 */
function demo_layout_plugin_filter_layout__layout_builder_alter(array &$definitions): void {
  // Remove all non-demo layouts from Layout Builder.
  foreach ($definitions as $id => $definition) {
    if (!preg_match('/^demo_layout__/', $id)) {
      unset($definitions[$id]);
    }
  }
}
PHP
Register custom layouts and their regions
The next step is to register the custom layouts and their respective regions. This process is well documented in the following drupal.org documentation: https://www.drupal.org/docs/8/api/layout-api/how-to-register-layouts
For this particular demo module we are going to define a one column and a two column layout. These columns will be able to be sized later with the settings we provide.
demo_layout.layouts.yml
demo_layout__one_column:
  label: 'One Column'
  path: layouts/one-column
  template: layout--one-column
  class: Drupal\demo_layout\Plugin\Layout\OneColumnLayout
  category: 'Columns: 1'
  default_region: first
  icon_map:
    - [first]
  regions:
    first:
      label: First

demo_layout__two_column:
  label: 'Two Column'
  path: layouts/two-column
  template: layout--two-column
  class: Drupal\demo_layout\Plugin\Layout\TwoColumnLayout
  category: 'Columns: 2'
  default_region: first
  icon_map:
    - [first, second]
  regions:
    first:
      label: First
    second:
      label: Second
YAML
Pay close attention to the path, template, and class declarations. This determines where the twig templates and their respective layout class get placed.
Creating the base layout class
Now that we have registered our layouts, it’s time to write a base class that all of the custom layouts will inherit from. For this demo we will be providing the following settings:
- Column width
- Column padding (top and bottom)
- Background color
- Custom classes
However, there is a lot of PHP to make this happen. Thankfully for the most part it follows a general pattern. To make it easier to digest, we will break down each section for the Column Width setting only and then provide the entire module at the end which has all of the settings.
src/Plugin/Layout/LayoutBase.php
<?php
  declare(strict_types = 1);

  namespace Drupal\demo_layout\Plugin\Layout;

  use Drupal\demo_layout\DemoLayout;
  use Drupal\Core\Form\FormStateInterface;
  use Drupal\Core\Layout\LayoutDefault;

  /**
   * Provides a layout base for custom layouts.
   */
  abstract class LayoutBase extends LayoutDefault {

  }
PHP
Above is the layout class declaration. There isn’t a whole lot to cover here other than to mention use Drupal\demo_layout\DemoLayout;. This class isn’t necessary but it does provide a nice one-stop place to set all of your constant values. An example is shown below:
src/DemoLayout.php
<?php

declare(strict_types = 1);

namespace Drupal\demo_layout;

/**
 * Provides constants for the Demo Layout module.
 */
final class DemoLayout {

  public const ROW_WIDTH_100 = '100';

  public const ROW_WIDTH_75 = '75';

  public const ROW_WIDTH_50 = '50';

  public const ROW_WIDTH_25 = '25';

  public const ROW_WIDTH_25_75 = '25-75';

  public const ROW_WIDTH_50_50 = '50-50';

  public const ROW_WIDTH_75_25 = '75-25';

}
PHP
The bulk of the base class logic is setting up a custom settings form using the Form API. This form will allow us to formulate a string of classes that get placed on the section or to modify the markup depending on the form values. We are not going to dive into a whole lot of detail as all of this is general Form API work that is well documented in other resources.
Setup the form:
/**
   * {@inheritdoc}
   */
  public function buildConfigurationForm(array $form, FormStateInterface $form_state): array {

    $columnWidths = $this->getColumnWidths();

    if (!empty($columnWidths)) {
      $form['layout'] = [
        '#type' => 'details',
        '#title' => $this->t('Layout'),
        '#open' => TRUE,
        '#weight' => 30,
      ];

      $form['layout']['column_width'] = [
        '#type' => 'radios',
        '#title' => $this->t('Column Width'),
        '#options' => $columnWidths,
        '#default_value' => $this->configuration['column_width'],
        '#required' => TRUE,
      ];
    }

    $form['#attached']['library'][] = 'demo_layout/layout_builder';

    return $form;
  }

 /**
   * {@inheritdoc}
   */
  public function validateConfigurationForm(array &$form, FormStateInterface $form_state) {
  }

  /**
   * {@inheritdoc}
   */
  public function submitConfigurationForm(array &$form, FormStateInterface $form_state) {
    $this->configuration['column_width'] = $values['layout']['column_width'];
  }

 /**
   * Get the column widths.
   *
   * @return array
   *   The column widths.
   */
  abstract protected function getColumnWidths(): array;
PHP
Finally, we add the build function and pass the column width class:
/**
   * {@inheritdoc}
   */
  public function build(array $regions): array {
    $build = parent::build($regions);

    $columnWidth = $this->configuration['column_width'];
    if ($columnWidth) {
      $build['#attributes']['class'][] = 'demo-layout__row-width--' . $columnWidth;
    }

    return $build;
  }
PHP
Write the column classes
Now that the base class is written, we can write column-specific classes that extend it. These classes are very minimal since most of the logic is contained in the base class. All that is necessary is to provide the width options for each individual class.
src/Plugin/Layout/OneColumnLayout.php
<?php

declare(strict_types = 1);

namespace Drupal\demo_layout\Plugin\Layout;

use Drupal\demo_layout\DemoLayout;

/**
 * Provides a plugin class for one column layouts.
 */
final class OneColumnLayout extends LayoutBase {

  /**
   * {@inheritdoc}
   */
  protected function getColumnWidths(): array {
    return [
      DemoLayout::ROW_WIDTH_25 => $this->t('25%'),
      DemoLayout::ROW_WIDTH_50 => $this->t('50%'),
      DemoLayout::ROW_WIDTH_75 => $this->t('75%'),
      DemoLayout::ROW_WIDTH_100 => $this->t('100%'),
    ];
  }

  /**
   * {@inheritdoc}
   */
  protected function getDefaultColumnWidth(): string {
    return DemoLayout::ROW_WIDTH_100;
  }
}
PHP
src/Plugin/Layout/TwoColumnLayout.php
<?php

declare(strict_types = 1);

namespace Drupal\demo_layout\Plugin\Layout;

use Drupal\demo_layout\DemoLayout;

/**
 * Provides a plugin class for two column layouts.
 */
final class TwoColumnLayout extends LayoutBase {

  /**
   * {@inheritdoc}
   */
  protected function getColumnWidths(): array {
    return [
      DemoLayout::ROW_WIDTH_25_75 => $this->t('25% / 75%'),
      DemoLayout::ROW_WIDTH_50_50 => $this->t('50% / 50%'),
      DemoLayout::ROW_WIDTH_75_25 => $this->t('75% / 25%'),
    ];
  }

  /**
   * {@inheritdoc}
   */
  protected function getDefaultColumnWidth(): string {
    return DemoLayout::ROW_WIDTH_50_50;
  }
}
PHP
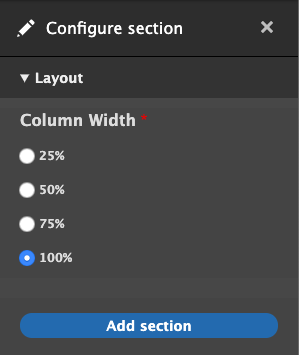
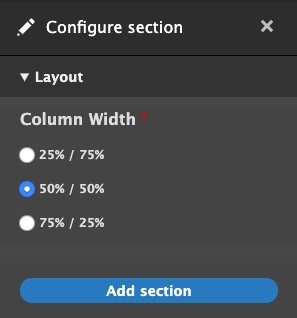
We can now check out the admin interface and see our custom form in action.
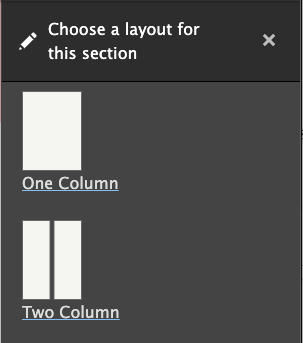
One column options:
Two column options:
Add twig templates
The last step is to provide the twig templates that were declared earlier in the demo_layout.layouts.yml file. The variables to be aware of are:
- Content: contains the block content for this layout separated by region
- Attributes: contains the custom classes that were passed in the base class build function.
- Settings:contains the submitted form values from the settings form.
src/layouts/one-column/layout–one-column.html.twig
{#
/**
 * @file
 * Default theme implementation to display a one-column layout.
 *
 * Available variables:
 * - content: The content for this layout.
 * - attributes: HTML attributes for the layout <div>.
 * - settings: The custom form settings for the layout.
 *
 * @ingroup themeable
 */
#}

{%
  set row_classes = [
    'row',
    'demo-layout__row',
    'demo-layout__row--one-column'
  ]
%}

{% if content %}
  <div{{ attributes.addClass( row_classes|join(' ') ) }}>
    <div {{ region_attributes.first.addClass('column', 'column--first') }}>
      {{ content.first }}
    </div>
  </div>
{% endif %}
Twig
src/layouts/two-column/layout–two-column.html.twig
{#
/**
 * @file
 * Default theme implementation to display a two-column layout.
 *
 * Available variables:
 * - content: The content for this layout.
 * - attributes: HTML attributes for the layout <div>.
 * - settings: The custom form settings for the layout.
 *
 * @ingroup themeable
 */
#}

{# Get the column widths #}
{% set column_widths = settings.column_width|split('-') %}

{%
  set row_classes = [
    'row',
    'demo-layout__row',
    'demo-layout__row--two-column'
  ]
%}

{% if content %}
  <div{{ attributes.addClass( row_classes|join(' ') ) }}>

    {% if content.first %}
      <div {{ region_attributes.first.addClass('column', 'column--' ~ column_widths.0, 'column--first') }}>
        {{ content.first }}
      </div>
    {% endif %}

    {% if content.second %}
      <div {{ region_attributes.second.addClass('column', 'column--' ~ column_widths.1, 'column--second') }}>
        {{ content.second }}
      </div>
    {% endif %}

    </div>
  </div>
{% endif %}
Twig
Notice settings.column_width was passed with a string: 75-25. We need to split it and place each value on our column which results in the following output.
<div class="demo-layout__row-width--75-25 row demo-layout__row demo-layout__row--two-column ">
  <div class="column column--75 column--first"></div>
  <div class="column column--25 column--second"></div>
</div>
HTML
Since these are custom classes, and we haven’t written any CSS, these columns do not have any styling. Depending on your preference, you can implement your own custom column styles or wire up a grid framework such as Bootstrap in order to get the columns to properly size themselves.
Wrapping it up
You should be at a point where you have an idea of how to create custom settings in order to theme layout builder sections. You can take this method and extend it however you need to for your particular project. There’s no definitive best way to do anything in the world of web development, and Layout Builder is no exception to that rule. It’s a great addition to Drupal’s core functionality, but for larger sites, it likely won’t be and shouldn’t be the only way you handle layout. Much like Drupal itself though, as more and more people use it, Layout Builder will only become stronger, more robust, more fully-featured, and better documented. If it doesn’t seem like a good fit for you right now, it may become a better fit as it grows. If it does seem like a good fit, be ready to get your hands dirty!
The full demo layouts module with all of the custom settings is available here: https://github.com/oomphinc/layout-builder-demo/tree/master/moduleexamples/demolayout