An *Updated* Tutorial on How to Use the WordPress WYSIWYG Editor
Updated January, 2016 to include screenshots and options from WordPress 4.4
For the over 74 million sites in the world using WordPress, it is amazing to me that there is no great tutorial to point our clients to about the WordPress Editor window. This post hopes to rectify that
First: Whizzy what?
WordPress uses a javascript plugin called TinyMCE for its WYSIWYG editor. WYSIWYG is an acronym for “What You See Is What You Get” and it is the best way to craft content before saving your post. The editor is pretty powerful, with multiple buttons and options for writing content. Most of the options are similar to those in a Word Processor — bold, italic, bulleted list style, etc… When designers like myself start to throw out terms like h1 and blockquote, most people’s eyes glaze over, but that is how these options are stored as HTML elements. Luckily, the WYSIWYG Editor does the grunt work for you.
Second: Some definitions and pictures
The “WordPress Editor” window is the main focus of any page that produces content in the WordPress admin section. Most people are familiar with it for posts, and it looks like this:
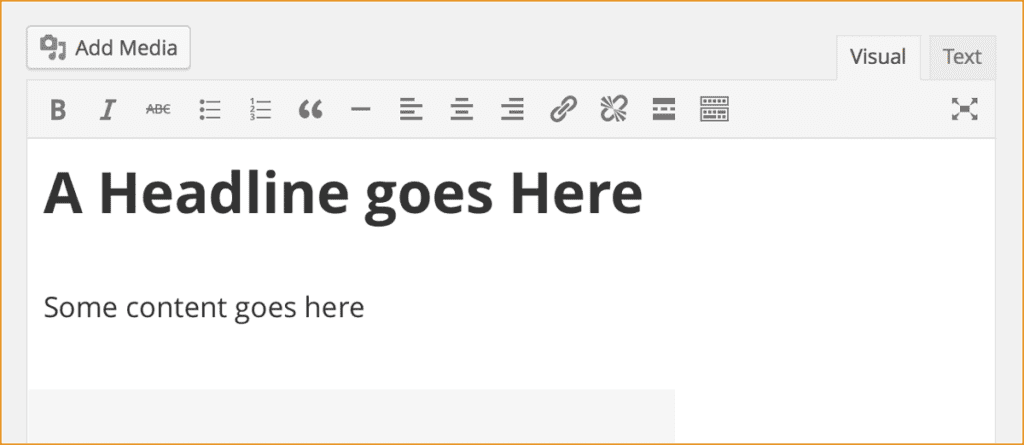
A good theme should have some styles set up so that content in this window more closely resembles how it will look in your theme — colors, font, heading styles, etc. This helps you craft content that will look great before you even hit the Save Draft button and preview it.
No Kitchen Sink
When you first use WordPress the “kitchen sink” is automatically set to off, so the Editor window will most likely look like this, with the following options:
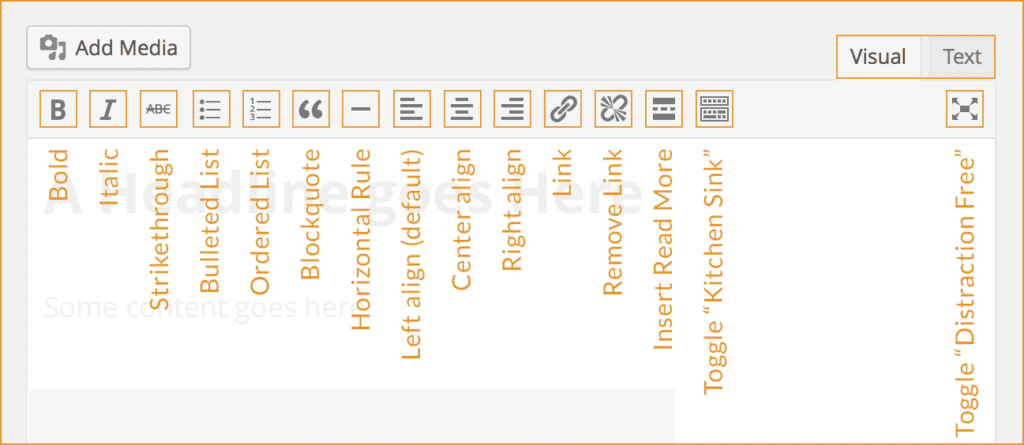
The options explained:
- Add Media: This button invokes an overlay for all of the uploaded media — images, documents, galleries, etc… Plugins will insert an icon in this area for additional media
- Content View Switcher: The Editor window can function as a Visual Editor (WYSIWYG), or as an HTML editor for those more adventurous (more about plaintext)
- Bold: Highlighted text will become bold. In HTML, this uses a
<strong>tag. Hotkey is ⌘ b (see the Help modal window for a list of Hotkeys and how to use them) - Italic: Highlighted text will become italic. In HTML, this uses the
<em>tag. Can be used in combination with the bold button. Hotkey is ⌘ i - Strikethrough: Highlighted text will appear with a line through the center. This uses the
<del>tag, and it is used to indicate text for deletion or removal, or to indicate that a change in the text has taken place - Bulleted List: Highlighted text will be formatted like a bulleted list. Depending on your theme’s style, the bullets may be round or square. Lists can be nested — a bulleted list may have a numbered list inside of it. In HTML, this uses a set of
<ul>and<li>tags for the “unordered list” and the “list items” - Numbered List: Similar to above, but with numbers. In HTML, this uses the
<ol>(ordered list) tag in combination with the<li>list item - Blockquote: Highlighted text will be indicated as a blockquote, which typically means that a whole passage has been quoted from another source. The style of it will vary from theme to theme, but most of the time italic text is used, it is indented, and may have quotes around it automatically. The HTML element is
<blockquote> - Horizontal Rule: Inserts a horizontal rule (a line) between elements. Uses the
<hr>tag - Left, Center and Right Align: These buttons will align highlighted text. Most themes align text to the left by default and this is how an author can break out of that mold. An author need not highlight a whole paragraph, as this style will be applied from one full return to another. In HTML, since there are no native tags for alignment, TinyMCE adds a
<p>tag around the paragraph with astyle=align: [direction]applied to it - Link (chain icon): The link icon is available for clicking only when text is highlighted. Hotkey is ⌘ k. Highlighting text and selecting this button will open a modal window where an author can enter a destination URL, choose whether or not to open in a new window, or choose to link to another page on their own site. In HTML, the tag used is
<a href=”http://example.com”>Link Text</a> - Unlink (broken chain): To remove a link, an author can highlight the whole link or simply place the cursor within the link and select this button
- The “Read More” tag: WordPress has an option of adding this physical break to the post — breaking it into two sections, the introduction and the body. If your theme displays the entire post by default on category landing pages, the “more” break is a way to show only some of the content, forcing users to click a “Read More” link to see the rest of the body of the post. Upon clicking the “Read More” link, the user will be brought directly to an anchor in the text where the post continues, so they do not have to read the same introduction again. If your theme’s landing pages use excerpts instead, this “more” break may not have the intended effect
- Kitchen Sink: This button toggles on/off an additional row of options for styling your post. Those options are explained in the next section
- “Distraction Free” writing mode: Toggles a full screen view of the editor so authors can concentrate on composing their post.
Kitchen Sink!
With the kitchen sink option is enabled (and WordPress remembers your preference), a whole slew of additional options are present.
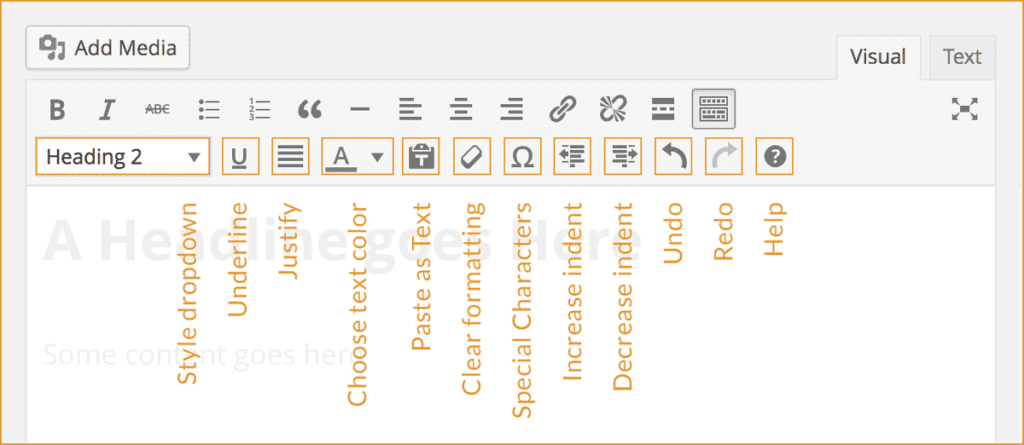
- Style dropdown: Within this drop down are styles intended for block-level elements — paragraph, pre-formatted, heading 1, heading 2, etc…The best way to think about inline vs. block-level may be this: A bold tag is inline, because you can bold a portion of a sentence; A Heading 1 is block-level because it will effect all the text in a block, from one hard return to another.
- Underline: Highlighted text will have an underline applied to it. In HTML, the tag is
<ins>(for “insert”). An underline usually indicates a link, so be sure to use this tag correctly and don’t fool your readers into thinking something might be clickable when it is not. Hotkey is Command u - Justify: Another alignment option. This one is by itself because authors should use it carefully — browsers do not hyphenate text by default, so this style may create “holes” in your paragraphs when spacing between words need to be very large
- Text color: Highlighted text will turn a variety of colors by using this button. When clicked, a standard palette of colors will appear for you to choose from, and a limitless palette is shown when the “Custom” option is clicked
- Paste as Text: THIS BUTTON IS AWESOME! Very useful for authors who cut and paste text from other sources. Toggles the “paste as plain text” feature on/off. Ever copy text from another website, and all the styles come with it? Soon you have a mish mash of styles in your post. You can get frustrated scraping the style tags in HTML view, or you can paste with this button “on”
- Clear Formatting: WordPress will attempt to remove inline styles applied to highlighted text. While this icon is an eraser, it must be noted that it does not always remove every style. It does a better job removing styles that the editor has added in already. It does not consistently remove styles from text that has been cut and pasted from other sources
- Special Character: This modal helps to insert foreign or mathematical characters that are hard to access unless you know the combination keystrokes
- Remove / Add Indent: A highlighted block-level element will be indented or un-indented with these buttons. Since there is no HTML element for this, TinyMCE adds a
style="margin-left: 30pxto the element. 30px is the default indent increment - Redo / Undo: Keeps track of changes and allows the author to undo or redo a set of changes. I’m honestly not sure how many changes it will keep in memory before they get lost (it probably varies from browser to browser)
- Help: A simple modal with Basic and Advanced tips will pop up when this is clicked. The most interesting to me is the table of “Hotkeys” available to authors. Did you know ⌘ Alt 1 will make a selection take on the Heading 1 style?
Styles dropdown menu
The contents of the “Styles” drop down are important to distinguish as they are important block-level elements. This means that a whole paragraph — or “block” from one hard return to another — will have the style applied, not just a portion of a sentence or a single word. The styles are as follows:
- Paragraph: Used by default, but useful if you have chosen another style and want to change it back to the paragraph style. In HTML, this is the
<p>…</p>set of tags - Heading 1, 2, 3, etc… These are great and every author needs to know how to use them. The concept is simple — lower numbers are more important, with Headline 1 being the most important. Search engines use these tags to determine where the important phrases are in the content (and in the page in general) so they should be used not only because they help organize your story, but because they also give your content extra weight. Some themes will remove the Heading 1 option, because the title of your post should be the only Heading 1 on the page
- Preformatted: The
<pre>tag is a tough cookie. It is intended to display text with white-space preserved, meaning that breaks in the text will be exactly as written. To me, this means trouble, as if there are no breaks in the text inside of this tag, then there are no breaks on the front-end as well, and that can lead to some goofy looking posts. A good theme will take into account the intention of a<pre>tag, but ensure that the display will not break the layout. Again, rarely used… most people use it to display chunks of code
Plain Text mode for the Brave
If you ever want to look under the hood and see some of the HTML code that TinyMCE is inserting, switch to Text mode instead of Visual. You’ll get an unstyled view of the content with raw HTML when applicable.
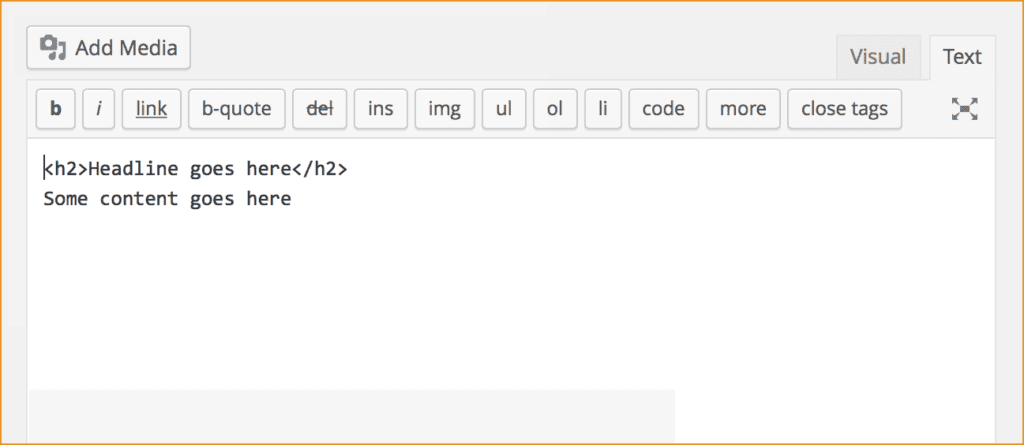
You will notice a few things… One, paragraph tags are not always present. There is an odd reason for this that we don’t need to get into, but WordPress basically inserts <p> tags when the post is rendered on the front end. It only stores them as part of the content when there is an additional style applied, like <p style="align: right">.
Two, some – but not all – of the WYSIWYG styles are present as buttons, with bonus “ins” and “code” buttons. Here’s a rundown:
- b (bold): covered previously. Inserts the
<strong>tag - i (italic): covered previously. Inserts the
<em>tag - link: covered previously. Inserts the
<a href="[destination]">tag - b-quote: covered previously. Inserts the
<blockquote>tag - del: covered previously. Inserts the
<del>tag - ins: BONUS The opposite of
<del>, called “insert”. Uses the<ins>tag around content that you wish to mark as new - img: While the “Add Media” button is persistent, this inserts a raw
<img>tag and uses a modal window to enter the URL of a specific image - ul (unordered list): covered previously. Inserts the
<ul>tag and<li>elements - ol (ordered list): covered previously. Inserts the
<ol>tag and<li>elements - code: BONUS Inserts the
<code>tag around a selection to indicate that the text should be styled like a code block (typically in a monospace font, maybe in green) - more: covered previously. Inserts the WordPress “Read More” tag, which looks like
<!--more--> - close tags: A utility button that will attempt to close any tags that have not been properly closed, which could lead to some funky rendering on the front end
That’s all folks!
Thanks for reading, and I hope this helps. There is a lot of options packed into this little Editor window, so take advantage of the array of style options WordPress gives the author. Happy blogging!